From Straight to Waves: Your Complete Heatless Hair Curler Guide for 3 Different Styles

Dreaming of beautiful, natural waves but worried about heat damage? You’re not alone. Heatless styling has become the go-to solution for achieving gorgeous curls without compromising hair health. A heatless hair curler works by using moisture and tension—rather than extreme heat—to set your hair into long-lasting waves. This method eliminates frizz, prevents dryness, and protects your hair’s natural integrity. In this comprehensive guide, we’ll walk you through three popular types of heatless hair curler tools, complete with detailed, beginner-friendly tutorials. Whether you want loose beach waves, defined curls, or effortless texture, you can achieve salon-worthy results at home while you sleep or relax.
Preparation: Choosing Your Tool & Prepping Your Hair
The key to successful heatless curling starts with selecting the right heatless hair curler for your hair type and desired look, followed by proper hair preparation.
1. Match the Heatless Hair Curler to Your Hair
Different tools create different effects. Here are three excellent heatless hair curler options to consider:
The Large Wave Rod
- Best For: Medium to long hair, fine or medium textures, and those seeking relaxed, loose beach waves.
- Key Benefit: Simple to use and perfect for beginners, this rod creates uniform, cascading waves. It’s an excellent first heatless hair curler for anyone new to the technique. For this classic look, explore our recommended large wave heatless curling rods.
The Octopus-Style Curler
- Best For: Medium-length to shorter hair, thick or coarse textures, and anyone wanting bouncy, defined curls or ringlets.
- Key Benefit: Its multiple flexible “arms” provide superior grip and section hair naturally, creating tighter, more durable curls that last for days, even on stubborn hair types.
The Wrapping Band
- Best For: All hair lengths and types, especially those seeking soft, tousled texture or maximum portability for travel.
- Key Benefit: This versatile fabric heatless hair curler allows for customizable wrapping and creates the most natural, “I woke up like this” waves. It’s incredibly compact. Discover easy-to-use portable heatless curling bands perfect for your beauty bag.
2. The Essential Pre-Styling Routine
Perfect curls start with perfect prep. Follow these three steps:
- Start with Damp Hair: After washing, gently towel-dry your hair until it’s damp, not dripping. The ideal moisture level is about 70-80% dry. Hair that’s too wet won’t dry fully inside the heatless hair curler, and hair that’s too dry won’t hold the shape.
- Apply a Lightweight Product: Work a small amount of leave-in conditioner or a light curl cream through your mid-lengths and ends. This reduces friction, adds shine, and enhances definition without weighing hair down.
- Detangle and Section: Use a wide-tooth comb to remove all knots. Then, part your hair as you normally would. Smooth, detangled hair is crucial for even, tangle-free curls.
Step-by-Step Tutorials for Each Heatless Hair Curler
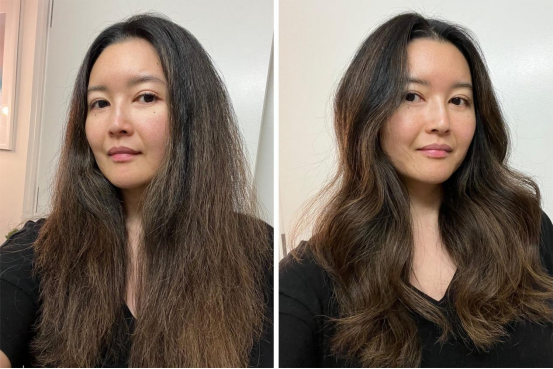
Tutorial 1: The Large Wave Rod for Effortless Beach Waves
Step 1: Secure the Rod
Place the center of the rod at your crown, along your part. Use the attached clips or bobby pins to secure each end firmly to your scalp so it doesn’t shift.
Step 2: Section and Wrap Your Hair
Divide your hair into two main sections (left and right). Starting with one side, take a 2-3 inch wide subsection. Begin wrapping the hair around the rod from the ends, moving downward in a spiral. Maintain even, gentle tension—firm enough to hold but not so tight it pulls. Secure the end of the subsection with a small elastic. Repeat until all hair is wrapped around the rod.
Step 3: Let It Set
Cover your hair with a satin bonnet or scarf to protect the style. Let it set for 6-8 hours (overnight is ideal). For very fine hair, you may need 8-10 hours for a strong set.
Step 4: Release and Style
Gently remove the elastics, clips, and finally the heatless hair curler itself. Do not brush. Use your fingers to separate the waves, starting from the bottom and working upward. Flip your head over and shake at the roots for volume. Finish with a light-hold texturizing spray. For the perfect heatless hair curler, see our guide to easy overnight wave rods.
Tutorial 2: The Octopus Curler for Defined, Bouncy Curls
Step 1: Create Multiple Sections
Part your hair. Then, divide it into 4-6 workable sections (e.g., bottom left, bottom right, top left, top right, plus a section for bangs/front pieces). Clip each section up and out of the way.
Step 2: Wrap Using the “Arms”
Take down one section. Split it into 1-1.5 inch subsections. For each subsection, place the ends into the center of the heatless hair curler. Gently twist the hair, then spiral it up and around one of the flexible arms. The hair should coil neatly around the arm. Tuck the end under or use a tiny clip to secure. Work methodically until every subsection of hair is wrapped onto an arm.
Step 3: Let It Set
Once fully wrapped, cover with a satin scarf. Let it set for 8-10 hours. Those with very coarse or resistant hair might leave it for up to 12 hours for the most durable curls.
Step 4: Release and Style
Carefully uncoil each section from the arms. Once all heatless hair curlers are removed, gently separate the curls with your fingers, scrunching upward to encourage volume and shape. Avoid brushing to maintain definition.
Tutorial 3: The Wrapping Band for Soft, Textured Waves
Step 1: Position and Secure the Band
Place the center of the band at your forehead or crown. Tie it securely at the nape of your neck, leaving two long tails of fabric.
Step 2: The Rope Twist Method
Divide your hair into two equal sections. Take one section of hair and one fabric tail. Twist the hair and the fabric together tightly, like you’re making a rope, all the way down to the ends. Once fully twisted, wrap this “rope” around the base of the band at your head to form a bun. Secure the end with the band’s clip or a bobby pin. Repeat on the other side.
Step 3: Let It Set
Cover with a scarf. This heatless hair curler method often sets faster. Leave it in for 4-6 hours (or even just 2-3 for very soft texture).
Step 4: Release and Style
Unpin and unwrap the twists. Shake out your hair. You’ll be left with soft, voluminous, tousled waves. Run your fingers through to separate. This is the ultimate method for creating easy, travel-ready texture with zero heat.
Pro Tips for Making Your Heatless Curls Last 2-3 Days
- Find the Tension Sweet Spot: Wrap hair with consistent, firm tension—not so tight it causes discomfort, but not so loose it fails to hold.
- Prioritize Setting Time: The longer you can leave the heatless hair curler in, the longer your style will last. Overnight is always best.
- Style with Your Fingers, Not a Brush: Always use your fingers to separate and shape curls. Brushing will turn defined waves into frizz.
- Refresh Between Days: On day two or three, lightly mist your hair with water or a water-conditioner mix, then scrunch. The curls will reactivate beautifully.
What to Avoid: Common Heatless Curling Mistakes
- Starting with Soaking Wet or Bone-Dry Hair: Aim for damp hair. Wet hair won’t dry inside your heatless hair curler; dry hair won’t curl.
- Wrapping Tangled Hair: Always detangle thoroughly first to prevent breakage and uneven sections.
- Brushing Out the Curls: This is the fastest way to ruin your heatless style. Finger-styling is mandatory.
- Using Heavy Styling Products: Stick to lightweight creams, mousses, or sprays. Heavy products can prevent the hair from drying and setting properly inside your heatless hair curler.
Conclusion: Beautiful Hair Without the Damage
A heatless hair curler is more than just a trend; it’s a healthier approach to hair styling. By choosing the right tool—whether it’s the simplicity of a wave rod, the definition of an octopus curler, or the effortless texture of a wrapping band—you can achieve stunning, consistent results without exposing your hair to damaging heat.
This method requires a little patience but rewards you with shiny, bouncy, healthy-looking hair. It’s a simple change in your routine that makes a dramatic difference in your hair’s long-term health and appearance.
Ready to transform your straight hair into beautiful waves? Find the perfect heatless hair curler for your needs in our complete guide to effective heatless curling systems.